by hello@healthfullyheather.com | Oct 30, 2019 | Recipes
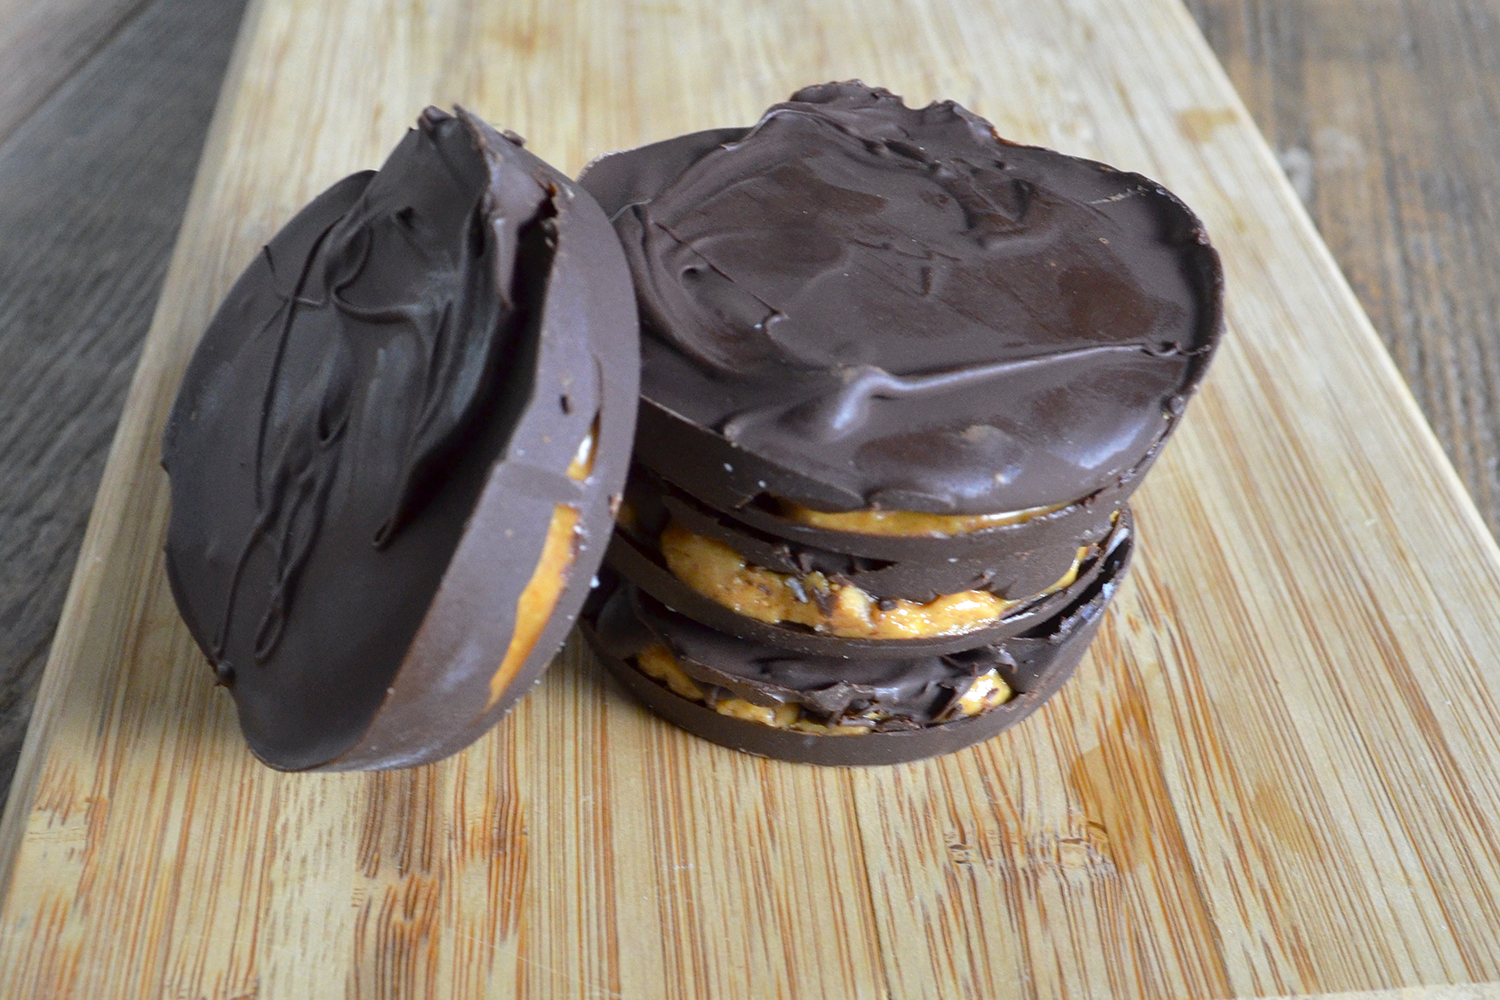
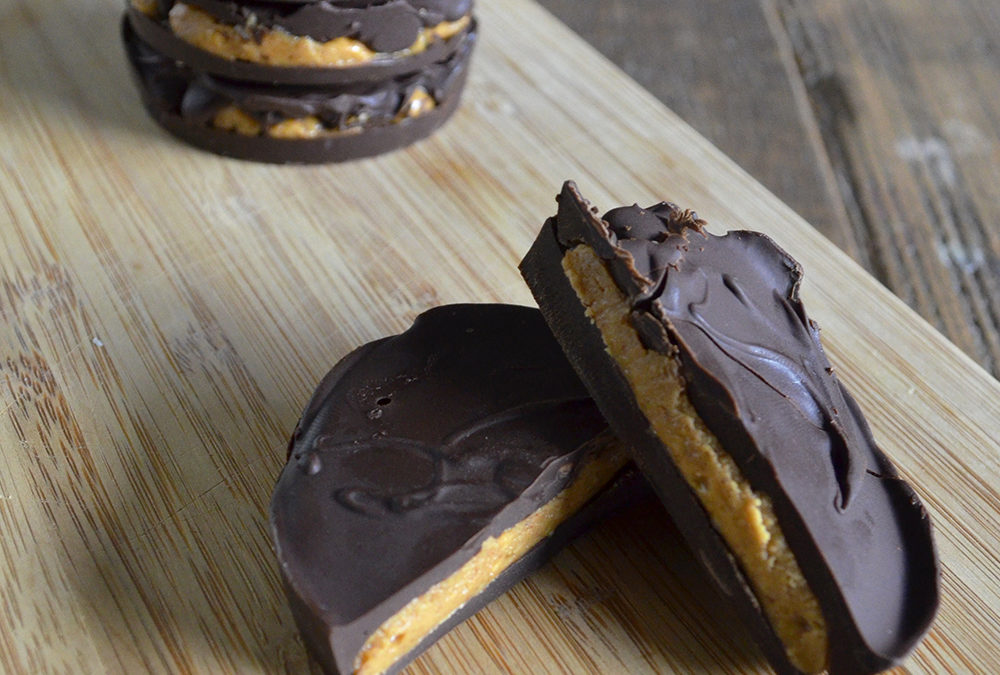
Peanut Butter Cups were always my Halloween go-to growing up. They were the one candy that I would protect and hide from my father who had a tendency to try and steal some of my Halloween haul. (We had to start buying him his own stash so that he wouldn’t take mine or what was meant for other kids!)
I think it’s the salty-sweet flavour profile of this combination that I loved the most. I use to bite around the edges first to get rid of the extra chocolate and improve the final chocolate to peanut butter ratio.
But ever since starting to make these “healthier” versions of my own at home, I’m totally hooked! I don’t even like the original store-bought any more. I far prefer my own quality dark chocolate and simple ingredients. Plus they’re so easy to make, and probably work out cheaper overall than what you’d get in-store.
What’s great is if you can’t have peanut butter, it’s really easy to substitute with any other sort of nut butter. Or even a sunflower seed butter if you need to stay away from nuts entirely.
What was your favourite Halloween candy growing up? Drop a comment below!
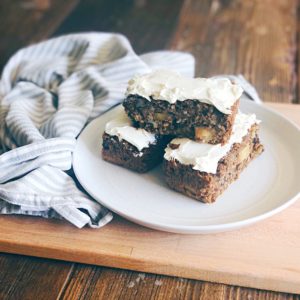
Peanut Butter Cups
Course Dessert, Snack
Cuisine American
- 200 g Dark chocolate
- ½ cup Peanut butter or other nut butter
Line a muffin tray with 8 liners or use a silicon tray.
In a bain-marie over low heat, slowly melt the chocolate, stirring continuously.
Once the chocolate is fully melted, pour 1-1.5 tbsp into each of the 8 muffin liners, spreading to completely cover the base. Set aside remaining chocolate.
Place tray in freezer for 10 minutes to set.
If your nut butter is fairly firm, warm slightly in a second bain-marie over a low heat until it becomes soft, stirring continuously. Do not overheat! It should be soft but not liquid-like.
Pour nut butter equally into the 8 cups over the chocolate base. Return tray to freeze for 10 minutes to set.
If needed, reheat the chocolate in the bain-marie. Pour remaining chocolate equally over the peanut butter layer.
Return tray to freezer for 30 minutes to fully set.
Once completely set, remove from tray and store in an airtight container in the fridge for up to a week.
A bain-marie is a method of cooking using one pot filled slightly with water with a second pot layered on top. The water should not reach the second pot, but the steam will gently heat it and allow the ingredients in the second pot to slowly melt with less chance of burning. If you don't have a nested pot like this, you can use a glass bowl that's base fits in the first, water holding pot.
Keyword Dairy Free, Gluten Free, Vegan, Vegetarian

by hello@healthfullyheather.com | Oct 15, 2019 | Recipes
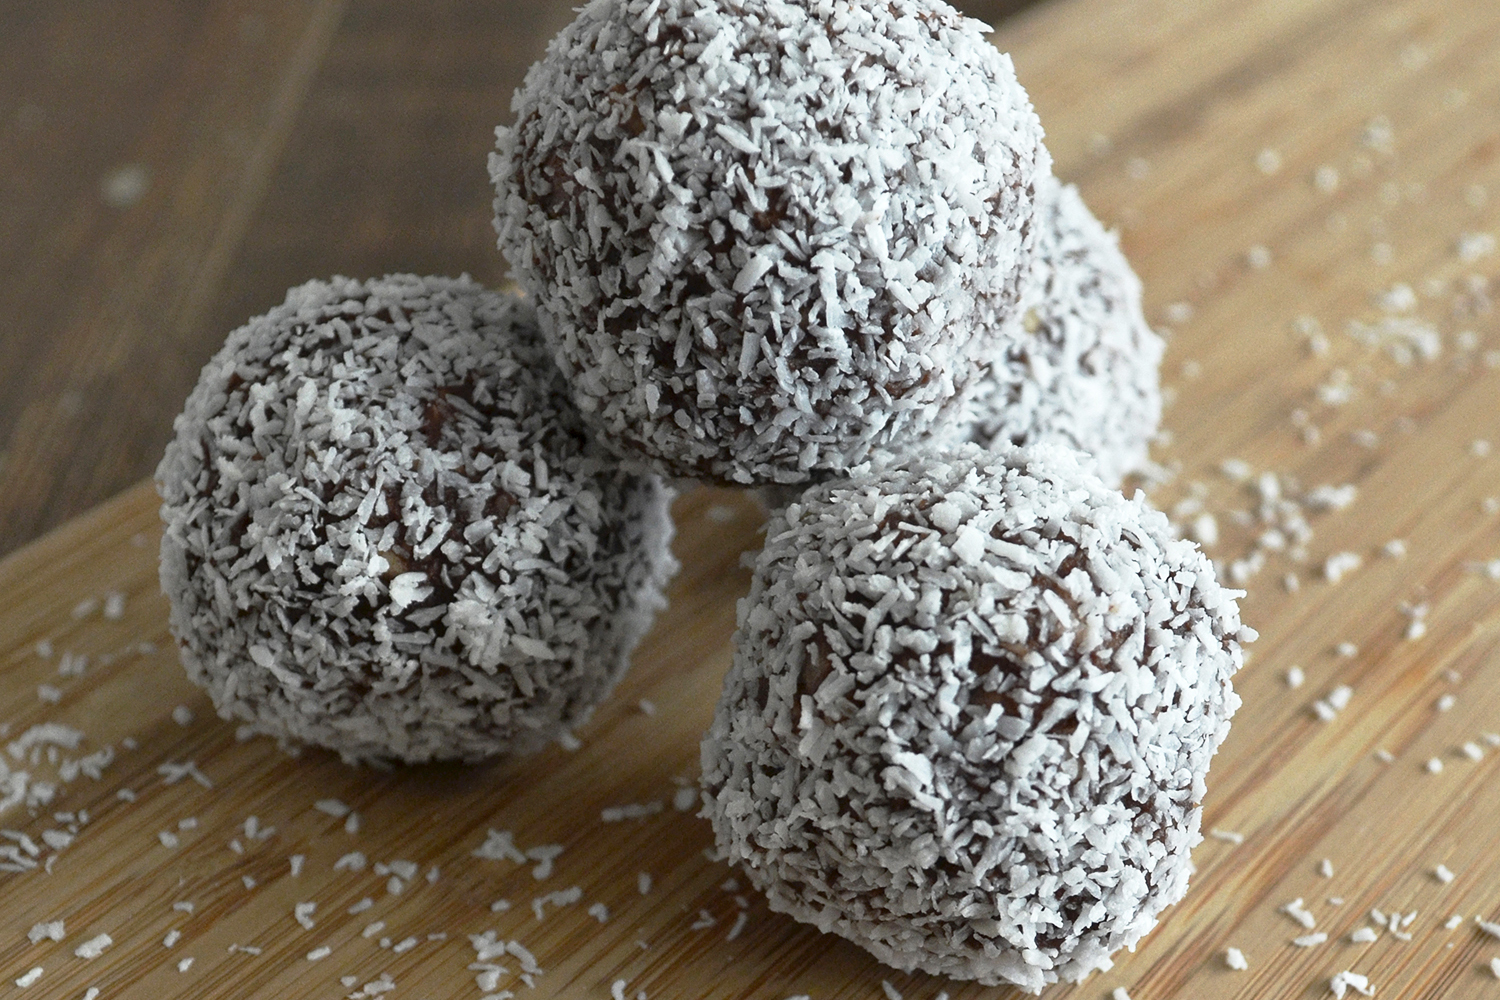
Bounty chocolate bars were definitely one of my favourite afternoon treats from the vending machine while I was working in my corporate life.
Too bad that consistent afternoon dip was actually a sign from my body that I wasn’t fuelling it properly!
But now that I have these bounty energy bites in my life, I have an easy snack replacement that will give me more energy without the crash that my previous Diet Coke and chocolate bar used to!
The great thing about making these yourself is that you get to control how much sugar goes in for sweetening the bites. I prefer dark chocolate, so I try to keep the extra sugar on the lower side. But if you need little bit more, then make the adjustment!
Just keep in mind that your sweet tooth might be getting boosted by a less than balanced diet. The less your body is used to having overly sweet foods, the sweeter your palate will find foods naturally.
Curious about more ways to fuel your body with proper nutrition for more abundant and consistent energy?
Join me on Wednesday, November 6th for a free webinar all about fuelling for energy! Click the button below for more info and to register.
Bounty Bites
Chocolate and coconut based enegry balls
Prep Time 20 minutes mins
Course Dessert
Cuisine American
- 80 g Cashews
- 1 cup Shredded coconut
- 110 g Chickpeas drained and rinsed
- 1/3 cup Coconut oil melted
- 2 tbsp Cacao powder
- 2 tbsp Honey or maple syrup
- 1/4 cup Shredded coconut for garnish
In a food processor or blender start by blending the cashews until a flour is formed.
Add remaining ingredients (except 1/4 cup of shredded coconut for garnish) and blend well until a smooth dough is formed.
Cover dough and set in fridge for 10 minutes.
Remove from fridge and roll into 12 equal-sized balls.
Spread the remaining 1/4 cup of shredded coconut in a shallow bowl or plate. Roll the balls in the shredded coconut to coat.
Store in an airtight container in the fridge for up to a week, or up to a month in the freezer. Enjoy!
Keyword Dairy Free, Gluten Free, Vegetarian
by hello@healthfullyheather.com | Sep 19, 2019 | Recipes
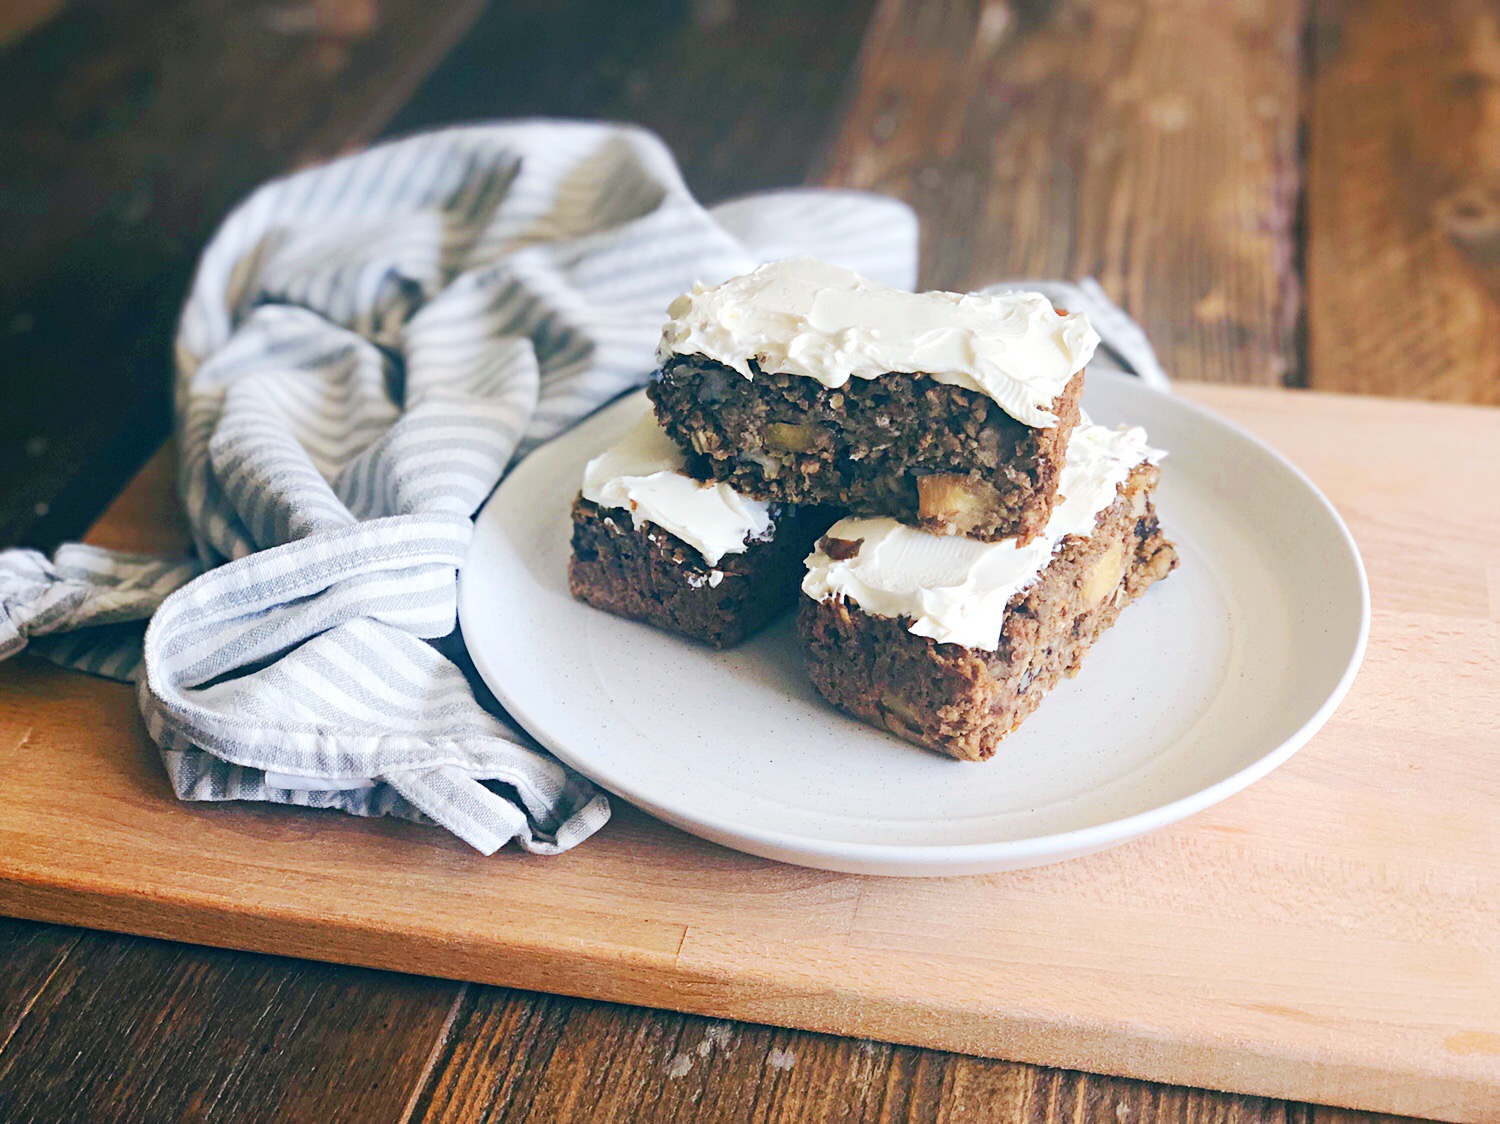
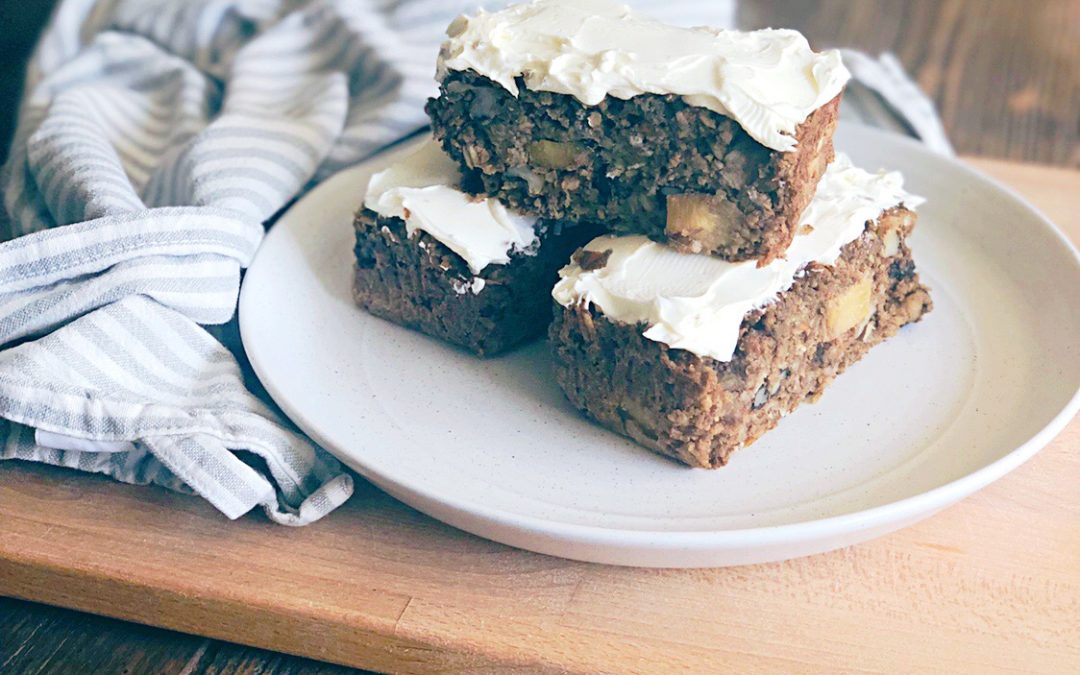
Growing up, carrot cake was my absolute favourite type of cake whether it was for birthdays or other celebrations. Except somehow I usually ended up getting chocolate cake, and the carrot cake seemed saved for my mom’s birthday instead. Can’t really complain too much about that, though! (I mean, cake is cake, right?!)
We always used a well-loved cookbook for our carrot cake recipe, and even though I’m not a huge fan of pineapple, it was a not-to-miss ingredient in our cake. Even now I love the twist that it adds to the recipe, giving it an extra bit of moisture and sweetness without the extra oils and added sugar.
I decided I wanted to have carrot cake for breakfast (it seemed like one of those things you just should do), so I needed to refine our family recipe to something a little more balanced – and I’m so happy with the results!
This oatmeal cake variation is everything that is amazing about carrot cake, but you can still happily eat it all week for breakfast. That’s a win for me! The oats make it quite filling so that you don’t need a huge portion, and it will stay with you all morning. Or just have a smaller slice as a snack!
I topped mine with plain cream cheese rather than creating a sugar-filled icing, but you can do whichever you prefer. I’m sure if you google “cream cheese icing” you’ll find plenty of possibilities.
Breakfast Carrot Cake
Prep Time 15 minutes mins
Cook Time 40 minutes mins
Course Breakfast, Dessert, Snack
Cuisine American
Dry Ingredients
- 1 cup oats
- 1 1/4 cup oat flour or oats ground using food processor
- 1 tsp baking soda
- 1 1/2 tsp cinnamon
- 1/2 tsp ginger
- 1/4 tsp nutmeg
- 1/4 tsp sea salt
Wet Ingredients
- 1/2 cup maple syrup
- 1/2 cup coconut oil melted
- 3 eggs large, room temperature
- 1 tsp vanilla
- 2 cups grated carrots packed
- 3/4 cup pineapple diced
- 3/4 cup walnuts chopped
Optional
- 200 g cheese cheese skip for dairy-free
Pre-heat oven to 160C / 320F. Line a 23x23cm (9x9") baking pan with parchment paper (cut two strips so that the paper continues up the sides of the pan).
In a medium bowl, add all the dry ingredients and whisk until well combined.
In a large bowl, mix together the maple syrup, coconut oil, eggs, and vanilla until well combined. If you have just melted your coconut oil, allow it to cool before using to ensure you don't cook your eggs!
Add in the grated carrots to the wet ingredients and mix until well combined.
Add the dry ingredients into the wet and mix well.
Fold in the diced pineapple and chopped walnuts.
Pour batter into the baking pan and spread out evenly in the pan.
Bake for 40 minutes. (If you test with a toothpick it should come away clean.)
Allow to cool, then remove from pan. "Ice" with the cream cheese. Cut into 8 slices and store in an airtight container in the fridge for up to a week. Enjoy!
You could also skip the creamcheese and freeze the bars instead, only icing them once defrosted and prior to eating.
Keyword Dairy Free, Gluten Free, Vegetarian
by hello@healthfullyheather.com | Jul 16, 2019 | Recipes
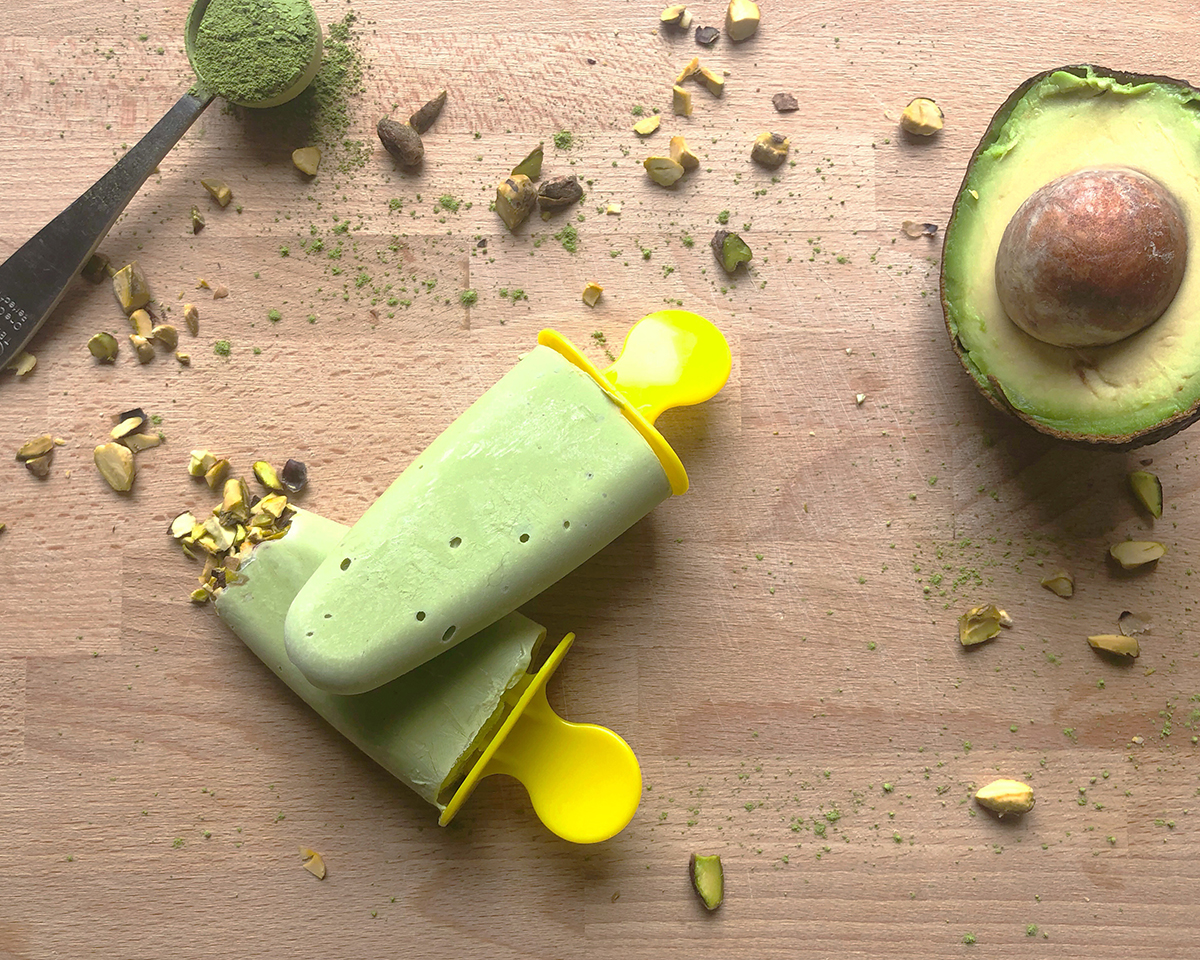
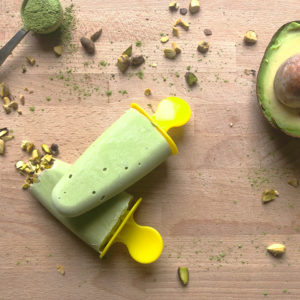
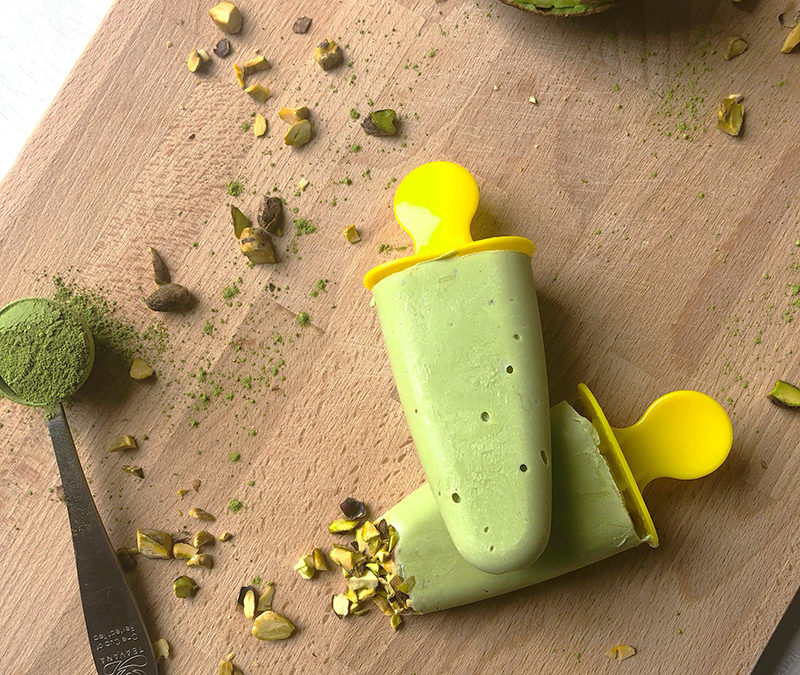
I tried out these avocado-matcha popsicles on a whim, curious to create a sweet treat that would be surprisingly satiating.
In the end these aren’t super sweet – although you can definitely up the honey if you want something sweeter. But these avocado-matcha frozen yogurt popsicles give you that refreshing feeling that you’re looking for in a popsicle but are filling enough to act as a good snack – or even as breakfast!
Try mixing some chopped pistachios into the blended mixture to add some extra crunch into your popsicle, or fill the bottom of the molds to have a pistachio tip.
While I used a full-fate Greek yogurt, these would be just as good using a non-dairy, coconut milk yogurt instead.
Bring on summer!
Avocado-Matcha Frozen Yogurt Popsicles
Prep Time 5 minutes mins
Freezing Time 3 hours hrs
- 250 mL Greek Yogurt full fat
- 1 Avocado
- 1 tbsp Honey
- 2 tsp Matcha Powder
- Chopped Pistachios optional
In a blender combine all ingredients except the pistachios and blend to fully combine. Taste test and add in more honey or matcha as desired.
(Optional, using a spoon or spatula, fold in the crushed pistachios)
Spoon into popsicle molds, leaving ¼-½ cm at the top empty as the popsicles will expand when frozen.
Set in freezer for at least 3 hours, ideally overnight.
To remove from molds, run the individual mold under lukewarm water, gently wiggling the popsicle stick until it comes free. Don’t get any water on the popsicle itself – just the mold. Enjoy!
Keyword Gluten Free, Vegetarian
by hello@healthfullyheather.com | Jul 8, 2018 | Recipes
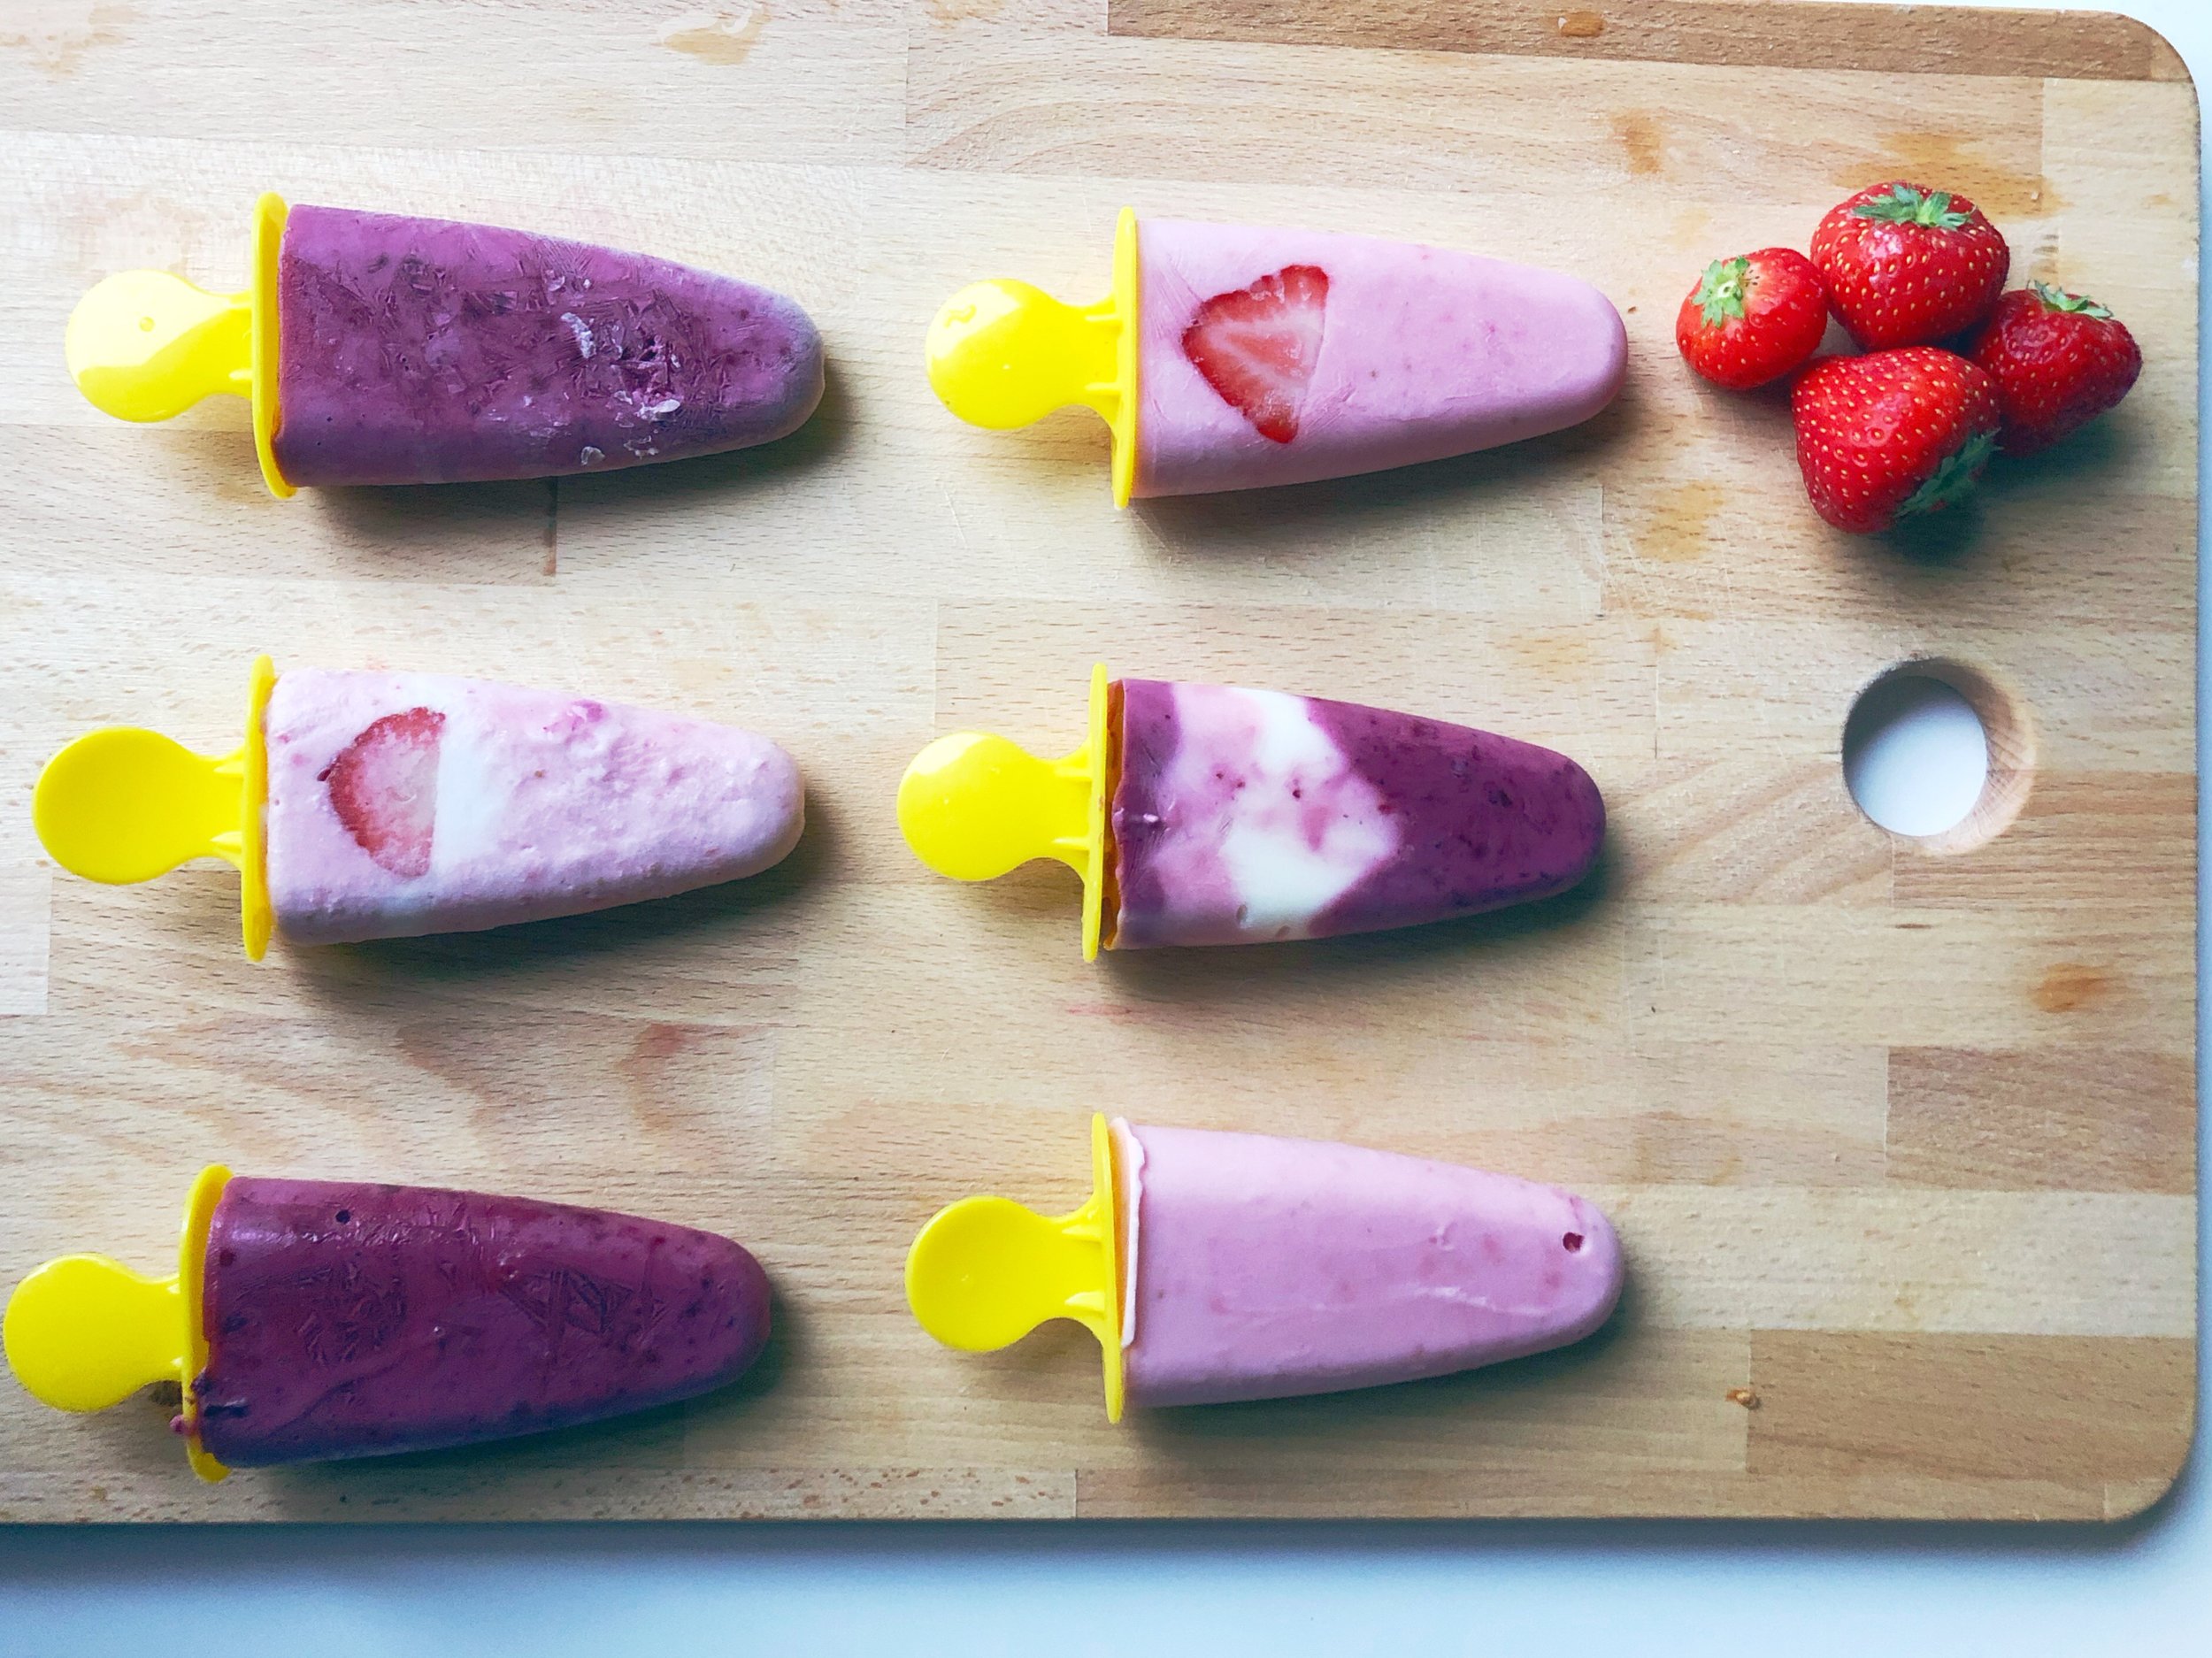
Berry season is officially in full swing! I don’t know about you, but I loved the Belgian strawberry season, and now I’m just as excited as the blueberries first raspberries make their way into the stores. We even had a few good harvests from our backyard raspberry plant already!
The nutrient content of different berries can vary, but in general they are a source of vitamins A and C as well as the minerals potassium, calcium, magnesium, and iron. Strawberries are one of the best berries for vitamin C, iron, and potassium. Raspberries are also high in vitamin C, calcium, magnesium, and iron and are lower in sugar but high in fibre. Blueberries tend to be a bit lower in these vitamins and minerals than the others, but are full of antioxidants.
There are many ways to enjoy your berries at any time of the year, but my favourite for this season is combined with yogurt for a healthy and nourishing frozen treat. Check out the recipe below and let me know how you like to enjoy your berries!
Very Berry Frozen Yogurt Popsicles
Either in a blender, food processor, or a measuring cup with immersion blender, blend together the yogurt and berries. Moderate your blending time depending on how smooth or chunky you want your popsicles to be. Taste the mixture and adjust to your desired flavor (for example strawberries will be sweeter than other berries so you may need less, for a tart berry like raspberry you might want to add a bit of honey).
Fill your popsicle molds with the mixture leaving around 0.3cm at the top as it will expand as it freezes. You can always experiment with layering mixtures of different berries or plain yogurt for different flavours and designs! Place the tops/sticks into the molds and set the popsicles in the freezer overnight. To remove from the molds carefully rinse the mold with lukewarm water until the popsicle can be gently wiggled out.
Makes around 6 popsicles of 60mL each.
* Try to find a full fat yogurt with no additives, especially sugar! Or try a non-dairy yogurt like coconut for a delicious tropical flavour.